Showing posts with label diy. Show all posts

Thursday, June 13, 2013

stripes!

 
remember this tablecloth?
 
i don't know how old it is because i've had it pinned for forever, but it's still available at anthro. you can buy yours here if you feel like dropping $250 on a tablecloth.
 
 
i had this pinned in my 'someday i wanna make this' board.
i just didn't ever get around to it and i figured somebody would pave the way and i could just follow their lead.
 
 
i was right.
oh happy day did it!!
 
you can find her 'how-to' right here.

 
and it's more neon.
who's a fan?
ME.
 
i have to say, hers is a little neater than the original.
i like the painted on quality of the anthro one.
so be messy :)

 
she's just the craftiest over there, at oh happy day.
her stuff always comes out spot on.
 
she has the original tablecloth as well,
and threw the most awesome donut party centered around it.
you can check that out here.
donut. party.
 
 
happy wednesday.
 
 
JILL

Tuesday, May 7, 2013

neeeeed this.


you guys.
i saw this this morning and gasp! i need it.

(i'd take that hair and her necklace, too.)


i can't find where to buy it.
but i want it.
i think it'd make the most excruciatingly, devastatingly, handsome swimsuit cover-up.

so.
here are 2 things that i have in my brain that makes me feel confident that i should attempt to make this cover-up for myself to wear this summer:

1-- i watch project runway.
like every season. every episode. of all time.
so that gives me all the false confidence in the world, that i can also do what they do in a day. or hours. it just might take me a smidge longer. (or alot.)

2-- i actually bought a dress form.
i bought it at an estate sale a while back. because i couldn't not buy it.
it was my exact body proportions and it was only $10. sure it was from 1950 but i figure they used to make things better back then anyway.


so with those 2 things in my arsenal, i figure....
why the heck not?
i sew. (kinda.)


i'm now looking for lots of yards of a breezey gauzy fabric. white preferably.

and then.
i'm gonna try.


(does project runway do that to any of you guys, too? make you just want to make stuff?)


until then.

JILL

Monday, April 29, 2013

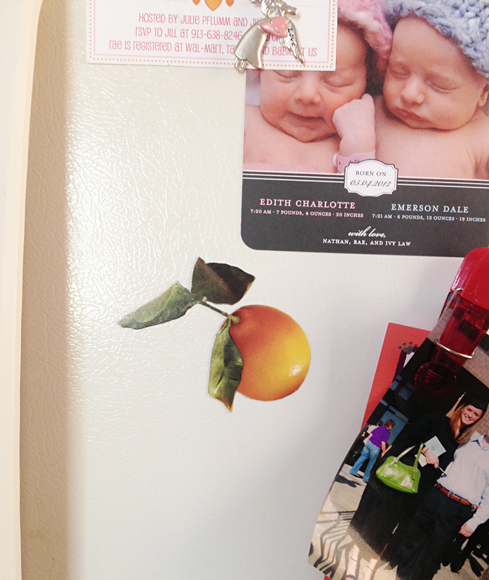
DIY martha magnets.


i had a great great weekend!
i want those weekends, every time. i didn't want it to end.


but i have a small, $2.99 diy that i did on sunday
and it only took me 20 minutes.
(and most of that time was looking through an old martha magazine from the 'archives')

easy cheap crafts are my favorite.

first, buy a sheet of $2.99 adhesive magnet for another project and get sidetracked.


days later, lazily look through an old martha stewart living on a totally gorgeous day,
with all your windows open, and not a care in the world.
(that part's important!)

this martha happened to be from april, 2010.

find the spread on citrus fruits quite beautiful and think to yourself, "self, where can i use this! i just love it!"
then rip it out.


then remember your magnet sheet that you were supposed to use for something else!


then stick them on there.
making sure it is smooth and without any bubbles.


then.
cut.


keep cutting.
keep your lines straight!


admire!


throw on fridge in your pink cottage kitchen,
on a totally gorgeous and lazy day, with all the windows open.


zoom in closer:


i love love a covered refrigerator.
it shows people live there! and their lives are important to them.

we always had our pictures and art and A+ papers on my family's refrigerator growing up and i plan to keep that going.

and my new magnets help that along.
plus they're pretty with my pink walls.
and i love them.


and do you want to see something cute?:


that's husband jay and i, on only the second day we had ever known each other.

in mexico on senior spring break. where we met. 2002.

only 18 years old and totally smitten with each other.

and that's also friend peter.
in puka shells no less.


back to the craft at hand.
don't you ever read your martha and LOVE the way its laid out?
how thoughtful they are with placement and color?
the photography?

it's like art every month in a magazine.
this time i decided to do something about it.
thanks, martha stew.


hope you had a great weekend.


love.


JILL

Wednesday, March 27, 2013

photos on the wall


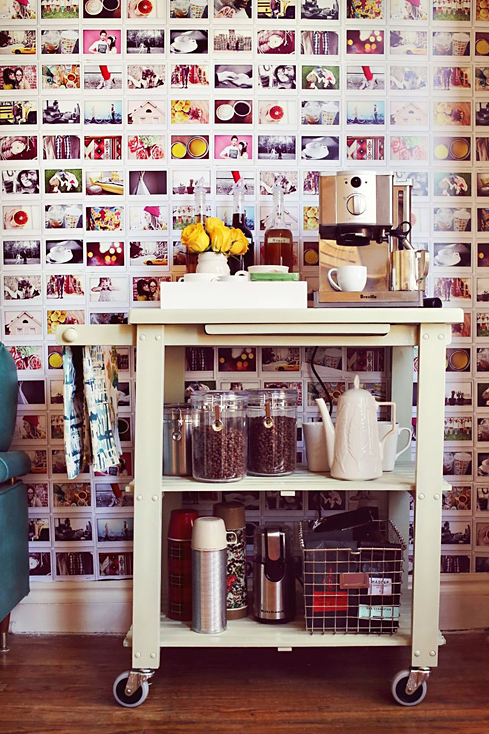
you guys, i stumbled upon this photo wallpaper over at a beautiful mess.


i am so obsessed with it!

they used photos from their instax instant camera, but you could just as easily do it with instagrams, and lord knows, i love instagram. and it looks super easy. they didn't print out each of those photos. they actually had pages printed of the images and then simply stapled em up to the walls. no glue,  no mess. awesome.

i don't have anywhere or any need for them at my house,
but my family's lake house, abso-freakin-lutely.

i'm calling my mom right now and pleading my case.

how fun? using years and years of lake photos from when we were small all the way up until now. fun. fun. fun. fun. fun.
i can't even.


photos are my jam.


JILL


Tuesday, March 26, 2013

diy marbled eggs


a few weeks ago i pinned this tutorial.
since then, i've had this nail polish marbling thing on my brain and wanted to marble something.


with easter coming up, i figured it was the best option.
i remembered hobby lobby always having those wooden eggs but when i was up there 2 weekends ago, i found these instead in the easter section. much better because they were already primed white and cheaper.
only $6.99 for this pack of 8, and all the easter junk was 40% off.
so a little over $4.


my only obstacle was how to get these eggs into the water with polish and then dry them, without getting my fingers in it and smudging the marbling.

so i drilled some teeny tiny holes with the smallest drill bit, 1/16", in the bottom of each egg.


just big enough for these pointed skewers i had to squeeze tightly into the small hole and hold my eggs. i think i also got those skewers from hob lob back in january when i made some birthday cake flags for my mom.


like the tutorial suggests, you need to have all your supplies ready to go because the nail polish dries fast on your water.


i just used an old glass vase i had.
and another tip, use warm water so your polish doesn't seize up on you.


the tutorial also mentions that it doesn't really matter about the quality of your polish, so while at cvs, i grabbed the cutest spring palette of the cheap stuff. from $.99 to $4.

i didn't take any photos of the during because it went really quickly.
plus there are tons and tons and tons of tutorials online of how to do it, and i'm sure they'd be better than mine.
i even youtubed some before i got started, just to make sure i had it down.
but the one i linked to at the top, was the best i found.


and here are my eggs drying.
i used the same drill to drill holes in the top of an old shoe box so they could dry without touching anything on the skewers.

worked like a charm, if i do say so myself.


i love how they're different.

now they're hanging in a gold bowl on my front coffee table.
i have this ceramic egg container that i was planning on using, in the pics above, but it covers up too much of my marbles :)


the mint and the neon are quite trendy, yes...
but i don't think i'll ever get over the neon thing... like for as long as i live...
so i think we're good.

i did see that camille styles posted this same project yesterday, but she used blown out eggs.
you certainly could do that as well, but with the wooden ones, you can save them for years to come without worrying about them smooshing into a million bits.

(and those holes i drilled are so tiny, i didn't even fill them like i had planned. they aren't noticeable.)


happy easter!


JILL


Tuesday, February 5, 2013

{bluebird}


i told you at the beginning of january that i was going to start posting more of my house projects. i was always a little hesitant to post them because 1- its my house and my project, and people on the internet can be mean little suckers. but 2- if i didn't have a huge whole kitchen gut-job reno to share, i wondered if my little one-afternoon-one-tube-of-acrylic-paint small project even mattered enough to share.

but i'm over all that :)

the blogs i like reading the most are the ones that share their projects, big or small.

so here's a very very small one i recently did.
but the little things add up, so one small project at a time is the way my house is becoming my home.


this is the walkway between my dining/living room and my den.
we spend 99% of our time in the den.

so we walk by this approx. 59 times a day.

this little parrot, my mom scored at home goods for $15.99.
it's resin but painted in a faux wood finish.

(don't mind the gatorade... i actually took this photo when i was stuck at home with the flu and i was re-hydrating. and don't mind my sewing machine, its permanently out on the dining room table because i've been making dolllllllllls!)

this bird wasn't as awesome as it could be, as is.
it was purchased to end up at our lake house.
so i was going to spray it high gloss white, sorta like the ones zgallerie was selling awhile back.

but it got placed on my bar cart, and i liked it there, and so i'm not going to let the lake house have it.
sorry, mom :)

for my house, the high gloss white... i wasn't sold.

so i lived with it for months with various different color ideas.
finally i was at joann fabric store and bought this:

martha stewart satin craft paint in "cloud".
i love this color so much, i'm contemplating having it color matched and re-painting my dark navy blue room. almost sold on the idea.
it's a great blue, but not baby-blue, with a little green and grey in it.

so i got to painting.

i painted the whole thing this shade of blue.
and when i was finished, it was cute but i liked it about as much as i did when it was 'wood'.

so i grabbed some black acrylic paint from my stash, i picked the flat finish, and painted the base.

now, i'm obsessed.


bluebird is better.

the bar cart is from a thrift store downtown, called good juju.
my mom also snagged that for me when i first moved in our house.

the polka dot paper was done on a whim 2 christmases ago.
its just wrapping paper under the glass.
and after christmas was over, i liked it so much i've kept it.


one project down.

one hundred million more to go.


JILL

Monday, January 28, 2013

fancy, and for like $5!


as promised, here's what i did to make my ruffled party streamers used for my mom's bday party on friday.

and sorry, i don't have a photo of them hanging up. wah wah.
but i decked out their whole house. like, if it stood still, i stuck something to it.
it wasn't a surprise party, so she kinda mentioned that she didn't want any of that ugly over-the-hill party junk you buy at the store... i wouldn't do that anyway.
but do nothing? yeah right.

so i made it girly. and colorful. and sparkly.
we had tie-died/marbled balloons, and pink ones with white polka dots,
and her name in glitter. twice.
gold, and black and white mixed it.
it turned out really cute, actually.


i had pinned the streamers over a year ago and was waiting for the perfect chance to use them.
it was originally from the awesome blog: made.


you can find the link to her whole her tutorial here, i won't list out the steps because i credit dana 1000%.
her directions were easy to follow and i've said this before, i own a sewing machine but i use the standard settings that it came with... and try not to touch much because i don't really know what i'm doing.
and she made it easy, even for sew dumb people like me!


so i ran to hobby lobby and bought a few rolls of their standard crepe paper for $1.29 a piece.
i got aqua, hot pink, red, blush pink, and yellow.

(then later i had to run to our standard party supply store for some other party stuff. mine's called fun services. they had every single color and shade of color under the rainbow and they were only $0.99. so if you don't like what hob lob has to offer, try elsewhere. and i'm sure online has em all, too.)


i chose hot pink and aqua first.
followed her directions, turning up my tension to 9 and my stitch length to a 5. those were both the highest settings for my machine.

she also suggested keeping your right hand on your thread at the top of your sewing machine, to keep an even tighter tension. and that helped. it made it even more ruffle-y.


this is how i kept it free flowing and tangle free... because this stuff is delicate and kinda high maintenance otherwise.


after you're finished, just roll it up and it's ready!


i did every 2-color combo and 3-color combo i could come up with.


(please don't mind my ugly dining table. it's been on the to-do list for a coat of high gloss black paint for oh, 3 years now. maybe this year's the year.)

and just went and went and went.

i was going to go until i ran out of crepe paper (which makes a ton)
but my sewing machine broke!!
 i swear i offended it somehow and now it doesn't like me.
second time in 2 months.

so instead of paying over half of what a new one costs to get it fixed, AGAIN...
i just got a new one.

the first one served it's purpose well.
and if one day i feel like paying to get it fixed, well then, i'll have 2.


but seriously, they're cheap at walmart.
and they have a 4 year we'll-replace-it-if-you-break-it warranty for only $15, so i took it.
and knowing me, i'll be using it, too :)


if you take your streamers down and store them properly, these will last for multiple parties.
so i think all of our parties just got a whole lot more festive.

{i think they're perfect for cinco de mayo*}


hope you had a good weekend.


JILL


Thursday, December 27, 2012

new dolls in town.


i have my cousin's 2 baby girls in the family.
one is 2, the other is 7 months.

you know my obsession with making dolls, as seen here,
so a day before christmas i decided i wanted to make some to give to the girls.
i love the ones jenny komenda made so i modeled them after hers.

i used only fabric i had in my stash, only running to hobby lobby for the pink and purple felt.
i think i was most excited for their hair :)

i didn't know exactly how the first one would turn out so i didn't even pause to take a photo. just when it was 80% finished.
voila.


i was kinda in love.
so i rushed to make the second.


as you know, i like color. and i like pattern. and i kinda like it when those two things are crazy and not totally matching, alot. so that's what i did.


once i get to a point where i'm almost finished, i get scared to do anything else for fear that i'll ruin the good thing i have going. so i almost left them without a face... but my mom thought that might creep the girls out.
so i pushed on to make their faces.


and i actually thought i ruined them, with those with those big, blank, hollow eyes... but waited until they had a mouth to decide if i needed a re-do... 


and thankfully, that's all that was needed.
a cute little, french, pink, puckered pout.
(made with a sharpie. i almost lost it, because what's more permanent than a permanent marker?)


getting packaged up to meet their little ladies.

and.....


approval!!


they loved them.
and so did my cousin :)


did you all have a great christmas?

were there any homemade dolls amongst you?


JILL